Friday, October 22, 2021

SAP: Business Technology Platform - How to Create an Entity and Deploy it to HANA Cloud DB

 In this post I am going to describe in simple steps how to create an entity (a table) using the Business Application Studio (BAS)  and Cloud Application Programming (CAP).

Before I start with the practical part, I want to share some thoughts on a possible business case where it makes sense to use CAP. 

For example, let us think of an application (FIORI Elements) that has the goal to store, monitor and analyse information related to a business object from the on Premise System, let's say a production plant. If the information we want to store is not related to production or logistics and not really needed in the BackEnd System, there is no good reason to store it on your on-Premise System. 

That is why it is always a good idea to ask ourselves and our team where we need the data. Do we need a picture of your factory in SAP BackEnd? Probably no. Does our BackEnd System need to know if the lightning in the Plant is good? Probably no. 
Our application can create Plant Management (PM) orders / notifications in the SAP BackEnd System only in the cases when somethings is not working, e.g. the lightning is out of order.
Is the information we are going to store on your Cloud DB sensitive? Does storing it on cloud violate the legal requirements of your company? If not, then you can consider saving it on the cloud. It is all about viewing the BPT and the on Premise System as one architecture and making the best choice.

The whole information and history of the stored data will be available on SAP BTP and we can create some analytical apps to monitor and evaluate it.

In the described case we would be are building an application that consumes (oData Services, probably some search helps)  from your on Premise system and stores the data on the SAP HANA Cloud.

To make the example more interesting, we will consider a customizing table where we define what information is going to be stored. Let us imagine something like outdoor area, indoor are, lightening, etc. Those areas can be evaluated with stars and with pictures. This table will be controlling the behavious of our application and we will need it on the Business Technology Platform.

Please consider that this and all other business scenarios on this blog are fully invented by me! 

Our first task is to create the customizing table and this is a quick and straightforward example.

In terms of CAP, the idea is to think of creating entities rather than creating tables. 

So the entity managing our applicaion will look like this:

Area : String(10)
Picture Upload:  Boolean
Evaluation Enabled: Boolean
PM Order Creation Enabled: Boolean

We also want to have some initial configuration like:

Area                    Picture Upload     Evaluation Enabled    PM Order Creation Enabled
Outdoor Area      true                       true                             false
Lightning            true                       true                             true


Let's have an overview of the prerequisites:

  • You have created a dedicated subaccount or you have a trial account on the Business Technology Platform
  • In your subaccount you have subscribed to the Business Application Studio
  • In you subaccount you have created a space and an SAP HANA Cloud DB Instance is running
Let's go to the BTP and create the entity:

  • If you haven't done so, now is the time to create and run your devspace of type Full Stack Cloud Application
  • In our devspace, we open a 'New Terminal' and change to projects by using 
cd projects
  • Then we create our projects by using the command
cds init plantapp

where plantapp where plantapp is the name of our project.
  • As a result we get three empty folders: app, bd and srv which are empty. In other terms, we have got the persistence layer, the UI layer and the service layer.
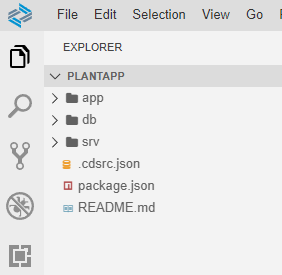
  • Now it is time to go ahead and create our entity. We go to db and create a file called schema of type CDS. The Type CDS is very important.
  • By saving the entity, it gets actually deployed to sqlite
  • The next step is to polulate our data. For this purpose we need to create a subfolder called data into our db folder. The name of the file is going to be the namespace / the name of the entity .csv
  • Through this we have filled the entity with the data specified in the .csv File
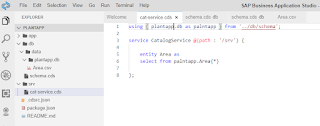
  • Now we can create a catalogue service. We create a file, for example cat-Service.cds in the folder srv. We need just a few lines of code for our service:
  • Time to test our Service
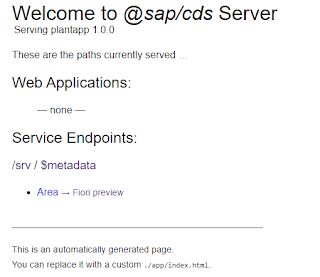
In the Terminal, type 'cds watch' and you will get the url of the oData Service Link.
When you klick it you will find the metadata of the service and even a ready fiori app where you can view your data.


  • Let's have a look at the Fiori Preview
This is what our Data looks like in Fiori


Our Application is running with in memory sqlite database.

We can deploy it to the cloud foundry by using the two following commands

  • cds add hana
  • cds deploy --to hana (Sets an HDI Container) 
For the creation of this post I have used this onboarding tutorial.


Wednesday, May 5, 2021

ABAP: Less Looping & Better Performance with the REDUCE Statement

 The  REDUCE statement in ABAP is a newer, more performant way of grouping numbers, strings and of course tables without nested looping and declaring too many additional helping variables.

In this post I am going to give some simple theorethical examples with numbers and strings and one more business related example.


  • Simple Sum
This is a rather theorethical example, that will help us understand the syntax. Here we want to sum the numbers from 1 to 100.
The result is the variable lv_i of type i.
The sum is in the variable s and is only valid in the reduce statement. 
j is our counter and so we go.Execute and you will get 5050 .


 data(lv_i=  reduce iinit s 0
  for until j > 100
    next s + j ).

  • String operation
This is another theorethical example. It demonstrates that we can use the reduce statement for non-arithmetic operations.


DATA(lv_textREDUCE stringINIT text | |
                              FOR |AB| THEN t && |0|
                                          UNTIL strlen10
                              NEXT text text && |{ t }| && |,).
The result is:

  • Business-related example
Let us take an example from the accounting and assume that we want to sum the amounts per trading partner. For simplicity, we will do this in one company code.

This is what my code would look like by using the old LOOP AT NEW statement:

TYPESBEGIN OF ty_sum,
*        bukrs TYPE bukrs,
         vbund TYPE rassc,
         dmbtr TYPE dmbtr,
       END OF ty_sum.


DATAlt_sum TYPE SORTED TABLE OF ty_sum WITH UNIQUE KEY vbund,
      ls_sum TYPE ty_sum.

TYPESBEGIN OF ty_bsis,
         vbund TYPE bsis-vbund,
         bukrs TYPE bsis-bukrs,
         gjahr TYPE bsis-grant_nbr,
         belnr TYPE bsis-belnr,
         shkzg TYPE bsis-shkzg,
         dmbtr TYPE bsis-dmbtr,
       END OF ty_bsis.

DATA lt_bsis TYPE SORTED TABLE OF ty_bsis WITH NON-UNIQUE KEY vbund.


SELECT vbundbukrsgjahrbelnrshkzgdmbtr FROM bsis INTO CORRESPONDING FIELDS OF TABLE @lt_bsis
  WHERE bukrs EQ 'XXXX' AND gjahr '????' AND vbund NE @space.

CHECK lineslt_bsis 0.

GET RUN TIME FIELD tstart.
LOOP AT lt_bsis INTO DATA(ls_bsis).
  AT NEW vbund.
    ls_sum-vbund ls_bsis-vbund.
    LOOP AT lt_bsis ASSIGNING FIELD-SYMBOL(<fs_bsis>WHERE vbund ls_bsis-vbund.
      ls_sum-dmbtr ls_sum-dmbtr + COND dmbtrWHEN <fs_bsis>-shkzg EQ 'S' THEN <fs_bsis>-dmbtr ELSE <fs_bsis>-dmbtr * -).
    ENDLOOP.
    APPEND ls_sum TO lt_sum.
    CLEAR ls_sum.
  ENDAT.
ENDLOOP.

* Record end time
GET RUN TIME FIELD tstop.

trun tstop tstart ).

The same with REDUCE:

The filter statement generates an internal with the desired records only, so that we can avoid the LOOP AT ...WHERE situation above.

LOOP AT lt_sum ASSIGNING FIELD-SYMBOL(<fs_sum_>).
  <fs_sum_>-dmbtr REDUCE dmbtrINIT val TYPE dmbtr
                                FOR ls_bsis_r IN
                                FILTER #lt_bsis
                                          WHERE vbund EQ  <fs_sum_>-vbund )
                                NEXT val val + COND dmbtrWHEN ls_bsis_r-shkzg EQ 'S' THEN ls_bsis_r-dmbtr
                                                             ELSE ls_bsis_r-dmbtr * -).
  WRITE<fs_sum_>-vbund<fs_sum_>-dmbtr NEW-LINE.
ENDLOOP.

The result is cleaner and more performant code!


Wednesday, April 14, 2021

SAP Data Connection for FIORI Apps: Catalogue Service Availability

 In order to develop different FIORI or freestyle UI5 applications, a list of settings should be made in the Business Technology Platform, in the Cloud Connector, as well as in the Back-End system.

Once the settings are made, the developers assigned to the subaccount can start creating FIORI applications.

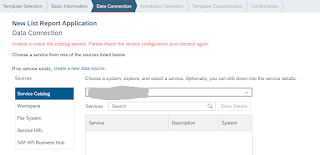
This post describes the possible issues behind the error message 'Catalogue Service Unavailable'.

If the Data Connection doesn't function properly, the following error message appears:


You can also debug this this error message in your browser and check the Network tab.


  • Catalogue Service

The issue here is that the Catalogue Service is not active.

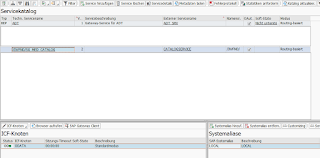
Check transaction SEGW and make sure that the services /IWFND/SG_MED_CATALOG and ADT are activated. 


As next, Go To Transaction SICF and make sure the nodes for the ADT and the Catalogue Service are activated.

  • Authorizations

If this doesn't solve the issue, you can check wether there are any authorization issues. Either run the authorization trace or check transaction su53 for the User in the destination.

  • Cloud Connector

Further on, check your SAP Cloud Connector.


Go To Cloud-to-on Premise and make sure the resources are available.


Make sure that also that sub paths are available.


Wednesday, April 7, 2021

Creating a simple FIORI Elements Application based on an oData Service (no single line of code)

 This is a continuation of my previous post where I explained how to publish an oData Service from a CDS view.

In this post I will demonstrate how to create a FIORI Application which consumes this CDS View. This will be done in the Business Technology Platform, using the WEB IDE.


In the WEB IDE, go to select 'New Project from Template'.

Then, select the List Application.

Enter the basic information.

Provide the Data Connection and find the oData service. (See previous post).


Maintain the Template Customization.


The newly created Test WL Application will appear in your Workspace and you can test it.


It looks like this: